Septic Installation Process: What Happens on Site
Key Takeaways
-
Begin with a property-specific septic blueprint encompassing site evaluation to final inspection. A thoughtful plan that takes into account the soil, layout, and wastewater needs ensures that you remain in compliance and avoid expensive rework.
-
Perform rigorous site selection and soil testing to pick safe locations and verify absorption rates. Identify and record these findings in a site plan that will guide the design, permits, and construction with minimal disruption to your yard.
-
Design your system for your household size, water usage, and local regulations, including the proper tank, drain field size, and treatment features. Find manufacturer instructions and standards that ensure performance and longevity.
-
Permits require full documentation and timelines to stay on schedule. Answer authority feedback expediently to avoid delays and resubmissions.
-
Handle installation in defined stages from site preparation to final hookups with specialized equipment and best practices. Anticipate temporary noise, dust, and restricted access and coordinate daily progress with the installer.
-
Post-install — final inspection, landscape restoration and a system handover. Have your septic system inspected or pumped regularly to protect groundwater, extend its life and prevent costly system failure.
Septic installation process means the steps to design, permit, size, locate, and construct a septic system for secure wastewater treatment. It begins with a site check that examines soil type, percolation rate, slope and groundwater depth. A designer then sizes the tank and drain field based on home usage, number of bedrooms and local code. Permits come next with a plot plan and soil data. Crews dig, set the tank, install distribution lines, stone or chambers approved gravel, and back fill. Inspectors review grade, setbacks, venting and access lids. Last steps include putting on risers, effluent filters and clear service markers. To assist in planning scope, cost, and schedule, the guide below details each phase, typical regulations, and advice to prevent delays and rework.
Your Property's Septic Blueprint
A septic blueprint outlines every stage from site review to last approval. It customizes the system to soil, on-site layout, and actual water use, complies with regulations, and minimizes the risk of expensive repairs.
Site Evaluation
This map determines where the tank and drain field are allowed to be located. Respect safe separation distances from wells, streams, buildings, and lot lines in accordance with local setback regulations. Strive for gravity flow from the house to the tank. Locate the drain field on firm ground with no pooling water and distant from trees that can inject roots into pipes.
Search for buried electric, gas, and water lines before you dig. Mark wells, retaining walls, embankments, and steep slopes to prevent cave-ins or runoff routes. Map access for an excavator, gravel trucks, and the tank delivery to minimize turf damage. Identify staging areas and a spoil pile location.
Design a scaled site plan locating tank location, drain field area, reserve field, pipe routes, and elevations. This steers design, permits, build, and final inspection.
Soil Analysis
Soil testing is an early gate. A percolation test measures the rate water sinks through strata and assists in determining whether a trench, bed, or mound is appropriate.
-
Texture and structure: sand drains fast, clay drains slow, loam is balanced.
-
Seasonal high water table too shallow raises contamination risk and may require raised systems.
-
Depth to bedrock: Thin soils limit trench depth and may push to engineered options.
-
Slope and drainage: Steep or wet slopes need erosion and runoff controls.
-
Organic content: High organics can clog. Sizing must consider it.
Record results for health department requirements and to determine trench depth, spacing, and loading rates. By incorporating real soil data now, you avoid slow drains, surfacing effluent, or soil pollution later.
System Design
Design to bedrooms, daily water usage, and if a basement ejector pump contributes flow. Lots of codes size by bedrooms as a proxy for peak load.
Specify a concrete tank designed for anticipated load, with access covers at grade for servicing. Size the drain field in square meters by soil loading rate. Include extras such as aerobic units or media filters if soil is tight or the lot is limited.
Inlet and outlet baffles, an effluent filter, inspection ports, and even distribution. Check to make sure that it’s up to building code, environmental regulations, and central permitting authority standards. Good design treats waste, protects groundwater, and remains invisible in the landscape.
Permit Navigation
Permit forms with the site plan, soil reports, and stamped design. Keep track of review windows and contractors to keep your schedule on track. Be swift in reacting to comments or necessary adjustments and return updated sheets to sidestep refusals. Final inspections check setbacks, elevations, watertight seals, and as-builts. Plan for future care too: pump the tank every 3 to 5 years to keep solids from reaching the field.
The Septic Installation Process
Septic installation crosses three functions: retain waste, treat water if needed, and infiltrate water under a design sanctioned by a local authority. Plans typically need a soil test, a floor plan, and manufacturer specifications to satisfy code.
1. Site Preparation
-
Prepare and slope the work zone allowing backhoes, compactors, and pumper trucks to navigate safely. This eliminates delays and saves landscaping repair costs.
-
Mark overhead and underground utilities and set up protective fencing around buildings, wells, and trees. This safeguards security and prevents downtime that can freeze the schedule.
-
Install silt fences or straw wattles to protect nearby drains or streams from sediment, which many permits require.
-
Establish a staging area for tanks, pipes, gravel, and trash bins. This keeps traffic neat and quickens installation, which minimizes noise and driveway congestion.
2. Careful Excavation

Crews dig tank pits and drain field trenches to plan depth and slope with excavators and laser levels. Soil type and moisture direct trench width and spacing. Groundwater and sidewall collapse risks require shoring, stepped cuts, or dewatering. Spoils are stockpiled for backfill, fenced from rain washout, and used only after inspections.
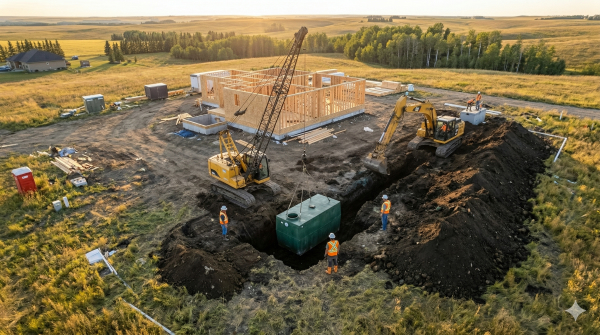
3. Tank Placement
We set the tank level and align to inlet and outlet. Concrete tanks are good for heavy-load or buoyant soils. Plastic and fiberglass support is good where access is limited or soils are corrosive. Install inlet baffle, outlet baffle, and an effluent filter to hold solids. Gaskets and solvent-welded or rubber-sealed joints render the tank watertight and minimize leak paths.
4. Drain Field Construction

Trenches receive washed gravel or sand and perforated pipe or chamber units where approved. Septic lines are spaced according to percolation rates from the soil test. Bad soils require mounded beds. Flow tests verify uniform distribution prior to backfill. Lines are mapped and marked to prevent future vehicle loads or tree roots.
Advanced treatment can be added if the soil restricts infiltration. Bionest, Ecoflo, System O, Hydro-Kinetic, or Ecophyltre are options. Certain sites require a second treatment step prior to infiltration to meet discharge limits.
5. Final Connections
Crews connect the home run to the tank and then run effluent to the field, installing pumps, control panels and alarms if the grade is flat. Pressure tests for leaks and flow. A pumper truck usually washes start-up gunk. Owners get as-builts, certifications, O&M guidance, and pumping schedules, generally every 3 to 5 years.
Selecting Your Septic System
Choosing the right system depends on site limitations, water consumption, and maintenance over time. Key factors:
-
Soil profile, percolation rate (T time), and groundwater depth
-
Maximum daily flow and peak loads from the home
-
Tank material durability, watertight build, and corrosion resistance
-
System type fit for space, slope, climate, and rules
-
Life-cycle costs include installation, power use, service, and pumping every one to three years.
-
Weather and frost depth impact field layout and pipe depth.
-
Local codes, permits, and manufacturer instructions
Tank Materials
Concrete
-
Pros: Strong, stable when backfilled, good for deep burial, long lifespan.
-
Cons: Heavy to set, can crack if the base is poor, needs high-quality seals, may corrode in acidic wastewater.
Plastic (polyethylene)
-
Pros: Light, easy to place on tight sites, immune to rust, smooth interior.
-
Cons: Can deform if not bedded well, buoyancy risk in high water tables, lower structural strength than concrete.
Fiberglass
-
Pros include high corrosion resistance, a rigid shell, being lighter than concrete, and a consistent factory finish.
-
Cons: higher upfront cost than plastic, can delaminate if damaged, needs careful anchoring where groundwater rises.
Above all, choose watertight joints and lids so that your septic system won’t leak and contaminate groundwater. Pair material to soil, traffic loads, frost depth and installer expertise. Adhere to local codes and the manufacturer’s installation instructions.
|
Material |
Pros |
Cons |
|---|---|---|
|
Concrete |
Strong, long life, deep burial capable |
Heavy, crack risk, corrosion in acidic effluent |
|
Plastic |
Light, easy handling, corrosion proof |
Deforms if misbedded, buoyancy risk |
|
Fiberglass |
Durable, corrosion resistant, stable shape |
Higher cost, possible delamination |
System Types
Conventional drain field: simple gravity tank-to-trench layout, low power needs, depends on good soil and space.
Advanced treatment unit (ATU, media filters): higher effluent quality helps smaller fields or poor soils and requires electricity, alarms, and regular maintenance.
Alternative solutions include pressure dosing, drip dispersal, mounds, or chambers for shallow bedrock, high water tables, or tight clay.
|
System |
Benefits |
Limitations |
|---|---|---|
|
Conventional |
Lower cost, simple upkeep |
Needs good percolation and area |
|
ATU/Filters |
Better treatment, flexible siting |
Higher install/energy/service costs |
|
Pressure/Drip/Mound |
Works on hard sites, even dosing |
Design complexity, seasonal sensitivity |
Look at efficiency standards, your local climate, harsh winters are tough on pumps, vents, and frost depth, and time of build, year round.
Sizing Correctly
Base size based on the number of households, fixtures, and peak flow. For a standard three to four-bedroom dwelling, a base design volume is two thousand liters, with allowance added for living area over two hundred square meters. Check minimums in local codes and health.
Use soil tests: percolation rate (T time) and textures guide field area and type. Sandy loam with T time of 20 or more can accept smaller trenches than slow clay. Confirm with hydraulic load testing on tricky sites.
Plan for growth: extra bedroom, accessory unit, or higher water use. Properly size now to prevent system stress, backups, or failed fields. While year-round installs are possible, frost depth can vary and alter pipe depth and drain field construction.
Why Your Installer Matters
A good installer saves your investment, your land, and local water. Quality work up front eliminates breakage, surprise expenses, and headaches down the road.
The Professional Approach
A skilled crew follows a mapped plan: confirm permits, stake boundaries, flag utilities, and stage materials. They conduct soil and percolation tests, size the tank and drainfield to site conditions, and set grade with a laser level so effluent flows by gravity without overload. Safety regulations govern trench support, shoring, and confined-space entry. Inspectors see critical stages prior to backfill.
Quality is evident in selections. Tanks have appropriate wall thickness, watertight risers, and inlet/outlet tees. Filtered effluent screens provide field protection. Pressure-dosed or timed dosing is used when soils require it. On rocky sites, they might use geotextile, chamber systems, or advanced treatment units to get the job done.
Homeowners stay informed. You receive a schedule, advance notice of noise or access requirements, and brief, clear updates when planning shifts because of weather or soil. Q&A gets direct on pump alarms, power consumption, and safe landscaping over the field.
They record each phase with photos, as-builts including depths and slopes, and pump specifications along with maintenance plans. This record assists with resale, warranty claims, and future service.
The Rushed Approach
Corners get cut when crews forego percolations, estimate drainfield size, or excavate without utility locates. Missing or incomplete permits result in fines or forced rework.
Cheap parts and ignored manuals mean leaks, tank float, or clogged laterals. Incorrect pipe slope or forgotten effluent filters can send solids into the field in months.
Safety incidents puncture soil walls, flood trenches, or leak waste. That jeopardizes both injury and damage to adjacent streams or wells.
Owners typically receive no orientation, no schematics, and no maintenance plan. When alarms go off or saturated ground emerges, you have no foundation to respond.
Long-Term Consequences
-
Premature drainfield failure and chronic backups inside the home
-
Groundwater pollution, well contamination, and health risks
-
Erosion, sink spots, and foul odors across the yard
-
Higher energy draw from mis-sized pumps and controls
-
Frequent pump-outs, jetting, and emergency callouts
-
Fines, citations, and mandated upgrades to meet code
-
Home value loss and harder home sales because gap records.
-
Full system replacement years earlier than expected
What To Expect Onsite
Work occurs in phases that transform the view of your yard and your home life for periods of time. Plan for earthworks, crew traffic, and set windows where water use is suspended. A transparent schedule, regular notifications, and straightforward ground rules ensure a secure and focused environment.
Project Timeline
The majority of installs take between 5 to 10 working days in typical soil and weather conditions. Site prep takes between 0.5 to 1 day and includes utility locating, layout staking, erosion controls, and access paths. Excavation takes between 1 to 2 days and opens the pit for the tank and trenches for the drain field; rocky or wet ground can add time. Tank install and level check takes between 0.5 to 1 day and includes bedding, setting, inlet/outlet alignment, and watertight seals. Drain field build takes between 1 to 2 days and involves installing pipes, chambers, or media with precise slopes, followed by filter fabric and backfill. Final connections and tests take between 0.5 to 1 day and tie in the house line, add risers, and verify flow. Backfill, grading, and cleanup take between 0.5 to 1 day and contour the site for runoff and safety.
Weather delays, permit review and inspection slots can move dates by days. Inspections happen both mid-project and at the end. No covered work goes forward until cleared.
You should see a simple milestone map: break ground date, inspection windows, connection day, and a target finish. Steep slopes, high groundwater, or poor access require additional shoring, dewatering, or hauling time.
Equipment Footprint

Here’s what we anticipate onsite: a backhoe or excavator for trenching, a skid steer for backfilling, a plate compactor, and a pump or delivery truck for the tank. These require obvious routes approximately 2.5 to 3.0 meters in width.
Staging areas contain the tank, pipe bundles, gravel or chambers, soil stockpiles, and dumpster. Crews mark them to maintain drive flow and minimize turf damage.
Driveways and walks are often covered with protective mats or plywood. Crews hand-dig within close proximity of marked utilities and fence around trees, wells, or gardens. If roots are threatened, they will prune or reroute.
Once installed, crews regrade, replace topsoil, and seed or sod. Hardscape cracks get patched, ruts are filled, and compacted.
Daily Disruptions
Noise, dust, and some vibration rise during digging and compaction. There might be short water or toilet breaks while cutting over. Our teams provide advance notice and try to schedule them during off-peak hours.
Some areas of your yard and drive may be blocked. Map out car seating and dog walks.
Keep up with a daily brief, reach out to the site lead for access requirements and adherence to taped zones for safety.
After The Installation
After-install jobs ensure the system is secure, defend your site, and establish transparent maintenance protocols that maintain performance year after year.
Final Inspection
Arrange a review with your local health unit or head. They verify that tanks, risers, baffles, pumps, alarms, and the drain field are installed according to plan.
Verify pipe slopes, watertight joints and venting. Verify setback distances, cover depth and surface grading so rainwater flows away from the lids and the dispersal area. If the design includes a distribution box or dosing chamber, check the level and flow balance.
Seal any gaps at lids, exposed pipe, or low spots that can pond. Make sure you fix any silted trenches, damaged geotextile, or crushed pipe before they sign off. Maintain a punch list until it is clear.
Get the green light before you send any sewage to the works. A solid install now provides years of reliable service.
Landscape Restoration
Regrade work zone to shed water from tank and dispersal area. Backfill topsoil, re‑lawn and replant with shallow‑root turf or native ground covers. Don’t plant deep-root trees near lines.
Clean up spoil piles, rock, and remaining fabric. Remove all fences, flags, and temporary silt barriers after the site is stabilized.
Use erosion controls where slopes exist: straw mulch, mats, or light hydroseed. Water lightly to aid seed set without soaking soil over the drain field. Significantly, mark lids and drain field edge for future service access.
Do not drive or park heavy loads onto the drain field. Look out for pooling water, soggy grass, or odors following rain. These can be signs of poor grading or premature failure.
System Handover
You should get a nice guide that maps components, displays photos, and service intervals. It goes over how the tank and drain field work, what to flush and what to keep out, like harsh chemicals and natural drain cleaning methods instead. Enzyme treatments assist in breaking down organic waste but don’t replace pumping.
Schedule the initial service call and have contacts for certified technicians. Schedule inspections every 2 to 3 years and pump the tank roughly every 3 to 5 years for an average home or earlier if there is heavy use. Follow sludge and scum levels to select timing.
Read over warranty terms, dos and don’ts, and parts coverage. Install water-wise appliances, such as low-flow toilets and faucets, and high-efficiency washers to reduce flow and prolong drain field life. Check your drain field frequently for wet areas or unusual odors. A good installation and consistent maintenance make sanitation dependable.
Conclusion
A smooth septic install boils down to defined steps, clean site work, and consistent maintenance. It all begins with soil tests and a correctly sized tank. Then the crew sets the trench, lays pipe, sets the tank, and backfills carefully. Don’t take any chances during the septic installation. Good gear, clean cuts, and tight seals reduce risk. A licensed pro keeps the work up to code and timely. Post installation, pump on a fixed cycle, monitor water consumption, and repair minor leaks quickly. Basic habits keep expenses down and system life long.
Looking for a next step? Consult two or three area installers for site walks and written bids. Compare scope, schedule, and service terms. Choose the one who responds professionally, demonstrates previous work, and guarantees it.
Frequently Asked Questions
How long does a septic installation usually take?
We install the majority of our systems in 3 to 7 days. It depends on soil conditions, weather, permits, and the type of system. A complicated site will require additional time. An installer will provide a specific schedule after a site evaluation and design approval.
What permits and inspections are required?
You usually require a site evaluation, design approval, and installation permit. Local health or environmental agencies inspect the system prior to backfilling. Your installer should take care of the paperwork, arrange inspections, and deliver compliance documentation.
How do I choose the right septic system for my property?
Align the system with your soil type, groundwater level, slope, space, and family size. A percolation test and site survey guide installation. Your installer or engineer will suggest options such as conventional, mound, or advanced treatment units.
What happens during the septic installation process?
Site evaluation, system planning, permit acquisition, excavation, installation of tank and leach field, pipe connections, inspections, and finishing work. The crew gets in and out, disturbs as little as possible, and follows code. Once approved, the system is covered and the site is restored.
How much does a septic installation cost?
Prices depend on system type, soil, site access, and local regulations. Anticipate a wide spectrum from medium to high investment. Request an itemized quote for design, permits, materials, labor, and contingency.
How should I prepare my property before installation?
Establish access roads, mark utilities, and safeguard trees or buildings. Prevent kids and animals from entering the work zone. Identify staging areas for materials and equipment. Your installer will give you a site plan and safety information.
What maintenance is required after installation?
Pump the tank every 2 to 5 years, depending on use. Check up on it yearly. Don’t flush wipes, grease, or chemicals. Keep traffic and excess water off your drain field. Maintain records and adhere to the installer’s care plan to lengthen system life.
Looking for something more specific? Explore Wastewater Solutions full range of services that includes:
Site Evaluation and Systems Design
For additional information, you may check these resources.
Wastewater Drainage Regulation